편리한 NLP를 위한 TensorFlow-Text와 RaggedTensor
TensorFlow Everywhere Korea(festa, fb) 에서 발표한 “편리한 NLP를 위한 TensorFlow-Text와 RaggedTensor”를 준비하면서 작성한 포스트입니다.
- 발표자료: 링크
- 발표영상: 페북 게시글 링크
- 발표에서 사용한 코드의 GitHub 링크: https://github.com/jeongukjae/nsmc-tf-text
이 포스트는 TensorFlow 2.4.1을 기준으로 작성되었습니다.
먼저 이 발표를 하는 이유를 설명드려볼게요. 예전에는 다른 라이브러리를 주로 사용했었어요. 다른 라이브러리도 굉장히 좋은 프로젝트라고 생각하지만, 실용적인 목적으로 사용하기에 프레임워크 단에서 많은 부족함을 느꼈어요. 그리고 TensorFlow를 깊게 사용하기 시작했는데, 생각보다 Billion 단위 이상의 대형모델이 아닌 이상 정말 빠른 실험 이터레이션을 가져갈 수 있었고, 짧으면서도 명확한 코드를 많이 가져갈 수 있었어요. 그래서 그런 면을 NLP 쪽으로, TensorFlow의 String 연산, TensorFlow Text와 관련지어 설명드리려 해요.
목차
- NLP 그리고 TensorFlow Text, RaggedTensor
- RaggedTensor
- 유용한
tf.strings, tensorflow-text - NSMC로 TensorFlow Text와 RaggedTensor 맛보기
1. NLP 그리고 TensorFlow Text, RaggedTensor
NLP와 친숙하지 않으시다면, TensorFlow-Text와 익숙하지 않으실 것 같습니다. RaggedTensor는 비디오나 오디오쪽이시라면 어쩌면 친숙하실 수도 있습니다. 두 기능은 NLP에서 빠져서는 안되는 기능인데, 하나는 데이터 처리를 도와주고, 하나는 데이터 표현을 도와줍니다.
TensorFlow Text를 먼저 설명드리면, 텍스트 기반의 모델에서 필요로 하는 전처리나, 기타 유용한 기능들을 TensorFlow Graph안에서 처리할 수 있게 도와주는 라이브러리입니다. 다른 머신러닝 분야와는 조금 다르게 NLP 분야의 자연어는 수학 연산 만으로 전처리를 해내기에 조금 어려움이 있습니다. 그래서 TensorFlow Core가 기본적인 텍스트 연산만을 지원한다면 TensorFlow Text는 딥러닝용으로 필요한 풍부한 텍스트 전처리를 지원하는 것이라 생각하시면 됩니다. 이번 포스트에서는 TensorFlow Core에 있는 연산들과 더불어 TensorFlow Text의 유용한 기능들을 소개해드리겠습니다.
RaggedTensor는 어떻게 보면 단순한 데이터 표현 컨테이너라고 생각하실 수도 있지만, TensorFlow의 Keras layer와 함께 사용한다면 정말 쉽게 텍스트 기반 모델링을 할 수 있습니다. 물론 텍스트가 아닌 오디오나 비디오같은 시퀀스 모델링에도 적용할 수 있습니다. 하지만 해당 내용은 제 전문분야가 아니기도 하고, 포스트 내용을 벗어나니 옆으로 잠시 제쳐두고 RaggedTensor의 기능을 소개드리겠습니다.
2. RaggedTensor
TensorFlow Text를 먼저 언급하긴 했지만, 조금 더 분량이 적은 RaggedTensor를 먼저 소개해드리고, 나중에 TensorFlow Text를 소개해드리겠습니다.
2.1. RaggedTensor vs SparseTensor
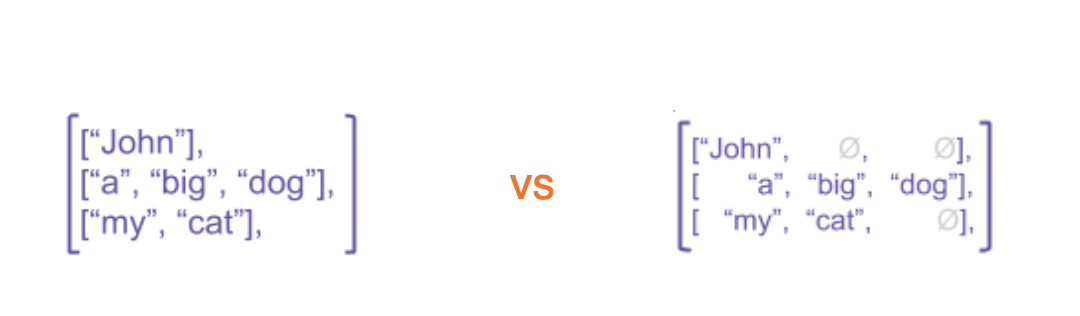
많은 분들이 SparseTensor에는 익숙하실 것 같습니다. 다른 프레임워크에서도 Sparse Tensor라고 부르고, 수학적인 명칭도 Sparse이기 때문에 더욱 그래보입니다. SparseTensor는 DenseTensor이지만 많은 부분이 비어있어서 값과 인덱스만 저장하는 것을 말합니다. 그래서 더욱 Sparse할수록 같은 크기임에도 더 적은 공간만을 차지하면서 더 빠른 연산이 가능합니다.
그에 비해 RaggedTensor는 크기가 정해지지 않은 불규칙한 크기를 가집니다. SparseTensor가 그런 것처럼 물론 data agnostic합니다. RaggedTensor는 아래와 같은 방식으로 생성이 가능합니다.
>>> tf.RaggedTensor.from_value_rowids(
... values=[3, 1, 4, 1, 5, 9, 2, 6],
... value_rowids=[0, 0, 0, 0, 2, 2, 2, 3])
<tf.RaggedTensor [[3, 1, 4, 1], [], [5, 9, 2], [6]]>
>>>
>>> tf.RaggedTensor.from_row_lengths(
... values=[3, 1, 4, 1, 5, 9, 2, 6],
... row_lengths=[4, 0, 3, 1])
<tf.RaggedTensor [[3, 1, 4, 1], [], [5, 9, 2], [6]]>
>>>
>>> tf.RaggedTensor.from_row_splits(
... values=[3, 1, 4, 1, 5, 9, 2, 6],
... row_splits=[0, 4, 4, 7, 8])
<tf.RaggedTensor [[3, 1, 4, 1], [], [5, 9, 2], [6]]>
위 세가지 방법이 전부 같은 RaggedTensor를 만드는 방법입니다. 근데 이렇게 단순히 “기존과 다른 자료형이다!” 정도라면 굳이 소개드릴 이유는 없겠죠? RaggedTensor를 사용할 때의 이점은 Keras Layer와 같이 썼을 때 알 수 있습니다.
2.2. 자연어와 RaggedTensor
많은 분들이 기존에 자연어를 전처리 후에 tokenize, index 변환(때로는 tokenize와 합쳐지기도 하죠), padding, 그리고 뉴럴 넷에서의 연산을 수행하실 텐데요, Ragged Tensor를 사용한다면, padding 단을 없앨 수 있습니다. 아래가 그 예시입니다.
>>> model = tf.keras.Sequential([
... tf.keras.layers.Input(shape=[None], dtype=tf.int32, ragged=True),
... tf.keras.layers.Embedding(32, 16),
... tf.keras.layers.LSTM(16),
... tf.keras.layers.Dense(16, activation='relu'),
... tf.keras.layers.Dense(3, activation='softmax'),
... ])
>>> model(tf.ragged.constant([[1, 2, 3, 4], [1, 2, 3], [4, 5, 6, 7, 8, 9]]))
<tf.Tensor: shape=(3, 3), dtype=float32, numpy=
array([[0.33290705, 0.33258146, 0.3345115 ],
       [0.3322196 , 0.33285874, 0.3349216 ],
       [0.332826  , 0.33172128, 0.3354527 ]], dtype=float32)>
만일 RaggedTensor가 없다면, 미세한 차이지만 패딩의 길이에 따라 표현값이 조금씩 달라지거나 mask값을 일일히 신경쓰면서 코드를 작성해야겠죠. 이런 기능들을 잘 이용하는 것이 코드를 읽기 쉽게 만들어주는 지름길이 되는 것 같습니다.
다만 아직까지 단점은 LayerNormalization과 같은 컴포넌트들이 RaggedTensor를 지원하지 않을 뿐더러, Batch Matmul과 같은 중요한 연산들이 RaggedTensor가 지원되지 않으므로 간단한 모델에 국한된다는 점이 있습니다. 예를 들어 Transformer 게열의 모델은 아무래도 구성하기 힘듭니다.
3. 유용한 tf.strings, tensorflow-text
그렇다면 이제 본격적으로 tf.strings 연산과 tensorflow text 연산을 짚어보도록 하겠습니다.
3.1. 한글과 Unicode

다들 아시다싶이 한글은 ASCII 코드 상에 속하지 않죠.
특히 CJK(Chinese, Japanese, Korean)에 속하는 우리나라 글자는 유니코드 중에서도 굉장히 다루기 힘든 편입니다.
다행히 tf.strings의 연산들은 유니코드를 잘 다룰 수 있도록 지원하는데요, 대표적으로 아래와 같은 경우를 꼽을 수 있습니다.
먼저 유니코드 문자는 한 문자의 길이가 각자 달라서 잘못된 길이를 재거나, substr 연산이 적절히 동작하지 않는 경우가 많습니다.
그를 위해 tf.strings 내부의 연산을 아래처럼 활용할 수 있습니다.
>>> string_tensor = tf.constant(["안녕하세요", "TensorFlow Everywhere Korea!", "😊👋🤗🥕"])
>>>
>>> tf.strings.length(string_tensor)
<tf.Tensor: shape=(3,), dtype=int32, numpy=array([15, 28, 16], dtype=int32)>
>>> tf.strings.length(string_tensor, unit='UTF8_CHAR')
<tf.Tensor: shape=(3,), dtype=int32, numpy=array([ 5, 28,  4], dtype=int32)>
>>>
>>> tf.strings.substr(string_tensor, pos=0, len=1)
<tf.Tensor: shape=(3,), dtype=string, numpy=array([b'\xec', b'T', b'\xf0'], dtype=object)>
>>> tf.strings.substr(string_tensor, pos=0, len=1, unit="UTF8_CHAR")
<tf.Tensor: shape=(3,), dtype=string, numpy=array([b'\xec\x95\x88', b'T', b'\xf0\x9f\x98\x8a'], dtype=object)>
>>> [s.decode("UTF8") for s in tf.strings.substr(string_tensor, pos=0, len=1, unit="UTF8_CHAR").numpy()]
['안', 'T', '😊']
>>>
>>> tf.strings.unicode_split(string_tensor, "UTF-8")
<tf.RaggedTensor [[b'\xec\x95\x88', b'\xeb\x85\x95', b'\xed\x95\x98', b'\xec\x84\xb8', b'\xec\x9a\x94'], [b'T', b'e', b'n', b's', b'o', b'r', b'F', b'l', b'o', b'w', b' ', b'E', b'v', b'e', b'r', b'y', b'w', b'h', b'e', b'r', b'e', b' ', b'K', b'o', b'r', b'e', b'a', b'!'], [b'\xf0\x9f\x98\x8a', b'\xf0\x9f\x91\x8b', b'\xf0\x9f\xa4\x97', b'\xf0\x9f\xa5\x95']]>
>>> [[s.numpy().decode("UTF8") for s in v] for v in tf.strings.unicode_split(string_tensor, "UTF-8")]
[['안', '녕', '하', '세', '요'], ['T', 'e', 'n', 's', 'o', 'r', 'F', 'l', 'o', 'w', ' ', 'E', 'v', 'e', 'r', 'y', 'w', 'h', 'e', 'r', 'e', ' ', 'K', 'o', 'r', 'e', 'a', '!'], ['😊', '👋', '🤗', '🥕']]
또한 머신러닝 모델이 사용자 입력을 직접적으로 처리한다면, normalization의 니즈가 많이 있겠죠. Unicode Normalization 연산은 TensorFlow Text에 존재합니다. 한글에 적용하는 적절한 예시를 생각해내지 못해 이 예시는 다른 언어로 해보겠습니다.
>>> text.normalize_utf8(['Äffin'])
<tf.Tensor: shape=(1,), dtype=string, numpy=array([b'\xc3\x84ffin'], dtype=object)>
3.2. 텍스트 처리에서의 tf.strings
본격적으로 모든 string을 TensorFlow Graph로 처리한다면 tf.strings와 TensorFlow Text의 많은 기능을 활용하게 될텐데요, 제가 소개드리고 싶은 기능은 아래 정도입니다.
tf.strings.splittf.strings.to_numbertf.strings.striptf.strings.regex_replace
데이터셋이 멀티라인이 존재하지 않는 tsv이거나, 지정된 포맷을 가지는 파일일 경우 위와 같은 연산들만으로 많은 경우를 커버할 수 있습니다. 예를 들어 NSMC의 몇행을 가져와서 파싱을 진행해보죠.
>>> tsv_rows = tf.constant([
... "6270596\t굳 ㅋ\t1",
... "9274899\tGDNTOPCLASSINTHECLUB\t0",
... "8544678\t뭐야 이 평점들은.... 나쁘진 않지만 10점 짜리는 더더욱 아니잖아\t0",
... ])
>>> splits = tf.strings.split(tsv_rows, sep='\t', maxsplit=2).to_tensor()
>>> string_inputs = tf.strings.strip(splits[:,1])
>>> string_inputs
<tf.Tensor: shape=(3,), dtype=string, numpy=
array([b'\xea\xb5\xb3 \xe3\x85\x8b', b'GDNTOPCLASSINTHECLUB',
       b'\xeb\xad\x90\xec\x95\xbc \xec\x9d\xb4 \xed\x8f\x89\xec\xa0\x90\xeb\x93\xa4\xec\x9d\x80.... \xeb\x82\x98\xec\x81\x98\xec\xa7\x84 \xec\x95\x8a\xec\xa7\x80\xeb\xa7\x8c 10\xec\xa0\x90 \xec\xa7\x9c\xeb\xa6\xac\xeb\x8a\x94 \xeb\x8d\x94\xeb\x8d\x94\xec\x9a\xb1 \xec\x95\x84\xeb\x8b\x88\xec\x9e\x96\xec\x95\x84'],
      dtype=object)>
>>> labels = tf.strings.to_number(splits[:,2], out_type=tf.int32)
>>> labels
<tf.Tensor: shape=(3,), dtype=int32, numpy=array([1, 0, 0], dtype=int32)>
위처럼 tf.strings에 존재하는 몇가지 연산을 조합해 매우 쉽게 간단한 포맷의 데이터셋을 파싱할 수 있습니다.
물론 Graph 모드에도 적절한 연산이면서, eager execution도 잘 지원합니다.
또한 tf.strings.regex_replace를 사용하면 간단한 전처리도 아래처럼 처리가능합니다.
>>> string_tensor = tf.constant(["안녕하세요 ㅎㅎㅎㅎㅎ", "안녕하세요!!!!!!"])
>>> string_tensor = tf.strings.regex_replace(string_tensor, "ㅎ{2,}", "ㅎㅎ")
>>> string_tensor = tf.strings.regex_replace(string_tensor, "!{2,}", "!!")
>>> [s.numpy().decode("UTF8") for s in string_tensor]
['안녕하세요 ㅎㅎ', '안녕하세요!!']
위 예시는 ㅎ이나 !와 같은 반복될 때 큰 의미변화가 없는 토큰을 줄여주는 과정을 tf.strings.regex_replace로 작성해본 예시입니다.
regex를 활용해서 많은 전처리를 수행할 수 있기 때문에 특별한 경우가 아닌 이상 전처리까지 TensorFlow Graph 모드에서 수행가능합니다.
3.3. tensorflow-text의 Tokenizer
이제 기본적인 텍스트 연산을 벗어나서 TensorFlow Text의 핵심기능인 Tokenizer를 소개해드리겠습니다.
현재 TensorFlow Text에는 아래 정도의 Tokenizer가 존재하는데요, 다섯가지 다 충분히 가치있는 Tokenizer라 생각하기 때문에 하나하나씩 소개해드리겠습니다.
text.WhitespaceTokenizertext.UnicodeScriptTokenizertext.SentencepieceTokenizertext.WordpieceTokenizertext.BertTokenizer- …
가장 일반적으로 사용할 수 있는 text.WhitespaceTokenizer은 가장 간단한 형태의 Tokenizer입니다.
Whitespace 단위로 토큰을 나누어주는 Tokenizer라, 텍스트가 전처리되지 않는다면 Unknown Token이 굉장히 많이 생깁니다.
그래도 전처리를 잘 한다면 충분히 의미가 있거나, 다른 처리(예를 들어 wordpiece tokenizer)를 하기 전에 단순하게 미리 나누어주는 용도라면 충분히 좋은 Tokenizer가 되겠죠.
>>> tokenizer = text.WhitespaceTokenizer()
>>> tokens = tokenizer.tokenize("안녕하세요! TensorFlow Everywhere!")
>>> [s.decode("UTF8") for s in tokens.numpy()]
['안녕하세요!', 'TensorFlow', 'Everywhere!']
text.UnicodeScriptTokenizer는 영어권 언어를 처리할 때 유용하다고 생각하는 Tokenizer입니다.
Unicode의 Script code를 경계로 나누는 Tokenizer입니다.
tensorflow text 문서에서는 https://unicode-org.github.io/icu-docs/에서 더 자세하게 볼 수 있다고 설명하고 있습니다.
아래에서는 느낌표와 한국어, 영어는 서로 다른 unicode script code에 해당하기 때문에 아래처럼 나뉘어집니다.
>>> tokenizer = text.UnicodeScriptTokenizer()
>>> tokens = tokenizer.tokenize("안녕하세요! TensorFlow Everywhere!")
>>> [s.decode("UTF8") for s in tokens.numpy()]
['안녕하세요', '!', 'TensorFlow', 'Everywhere', '!']
text.SentencepieceTokenizer는 보시는 그대로 google/sentencepiece 모델을 불러와서 TensorFlow Graph안에서 쓸 수 있게 만든 것입니다.
sentencepiece 레포지토리에서도 설명하듯 아래처럼 사용이 가능합니다.
지금까지 나온 Tokenizer와 다르게 tf.int32와 tf.string 둘 다 지원합니다.
sentencepiece는 학습시에 vocab table을 만드는만큼, 별도로 hash table을 관리할 필요도 없습니다.
Sentencepiece Tokenizer는 아래와 같이 쓸수 있습니다.
>>> tokenizer = text.SentencepieceTokenizer(model=open('spm_model.model', 'rb').read())
>>> tokenizer.tokenize(['hello world']) # output type = tf.int32
...
>>> tokenizer = text.SentencepieceTokenizer(model=open('spm_model.model', 'rb').read(), out_type=tf.string)
>>> tokenizer.tokenize(['hello world']) # output type = tf.string
...
text.WordpieceTokenizer와 text.BertTokenizer는 같이 설명드리겠습니다.
NLP 분야에서는 Huggingface의 tokenizer가 나오기 전까지 해보고 싶어도 시간 문제때문에 꺼려지던 WordPiece model을 tensorflow-text를 통해서도 드디어 사용할 수 있게 되었습니다.
여기서 text.WordpieceTokenizer는 정말 Word를 Wordpiece로 나누어주는 tokenizer이기 때문에 WhitespaceTokenizer와 WordpieceTokenizer를 통합한 text.BertTokenizer를 사용하는 것이 편합니다.
즉, WordpieceTokenizer가 안녕하세요를 안녕, ##하세요로 바꾸어 준다면, BertTokenzier는 여러분 안녕하세요를 여러, ##분, 안녕, ##하세요로 바꾸어주는 식이죠.
현재 stable release에서 Tokenizer는 사용가능하고, vocab을 만드는 기능은 사용하지 못하지만, nightly 버전(2.5.x)을 설치한다면 모든 버전을 사용할 수 있는데요, 아래처럼 사용이 가능합니다.
string_tensor_dataset = (
    tf.data ....
    .map( ...
) # string tensor만을 반환하는 dataset

from tensorflow_text.tools.wordpiece_vocab import bert_vocab_from_dataset as bert_vocab

bert_vocab = bert_vocab.bert_vocab_from_dataset(
    string_tensor_dataset.batch(1000),
    vocab_size=8000,
    reserved_tokens=["<pad>", "<unk>", "<s>", "</s>"],
)

with tf.io.gfile.GFile("vocab.txt", "w") as out_file:
    for token in bert_vocab:
        print(token, file=out_file)
하지만, 직접 돌려본 결과 속도면에서 크게 만족스럽진 않은데요, nightly 버전이기도 하고, verbosity 옵션도 존재하지 않기 때문에 실제로 사용하기에는 무리가 있어 보이지만, stable release가 된다면 기대해볼만 합니다.
4. NSMC로 TensorFlow Text와 RaggedTensor 맛보기
그럼 실제로 사용하는 예시를 보여드리기 위해 제목처럼 tensorflow-text와 RaggedTensor의 기능을 활용해 정말 짧은 코드로 NSMC 분류기를 작성해보려 합니다. NSMC는 Naver Sentiment Movie Corpus의 약어로 감정 분석을 위한 데이터셋이고 test, train셋을 합쳐 20만 문장 정도가 존재합니다.
4.1. 데이터 처리
많은 데이터 처리가 들어가면 좋겠지만, 최대한 간단한 버전으로 실행해보도록 하겠습니다. 전처리 없이 sentencepiece tokenize만 실행해보겠습니다.
그 전에 약간의 팁을 드리자면 한국어에서 sentencepiece나, wordpiece tokenizer만으로도 자소 단위의 tokenizing이 가능하다는 것을 알려드리고 싶어요. 그래서 해당 기능까지 활용해서 예시 코드를 보여드리겠습니다.
아래는 간단한 sentencepiece tokenizer 학습코드입니다. 대신 normalization rule을 없애고, 커스텀하게 Unicode Normalization을 NFD 형태로, 즉 한국어의 초성, 중성, 종성을 나누도록 normalize해주었습니다.
import io
import unicodedata

import sentencepiece as spm
import tensorflow as tf

def _get_nsmc_nfd():
    with open("nsmc/ratings.txt") as f:
        for line in f:
            yield unicodedata.normalize("NFD", line.split("\t")[1])

spm.SentencePieceTrainer.train(
    sentence_iterator=_get_nsmc_nfd(),
    model_prefix="spm",
    vocab_size=5000,
    normalization_rule_name="identity",
    pad_id=0,
    bos_id=1,
    eos_id=2,
    unk_id=3,
)
위처럼 sentencepiece 학습을 진행할 경우 아래와 같은 tokenization 결과를 볼 수 있습니다.
한국어는 동사의 시제가 변할 때 -ㅅ 받침이 붙는 식으로 많이 변해서 이와 같은 방법이 의미가 있을 때가 많습니다.
재밋는뎅 -> ['<s>', '▁재미', 'ᆺ는데', 'ᆼ', '</s>']
애틋한 영화네요 -> ['<s>', '▁', '애틋하', 'ᆫ', '▁영화네요', '</s>']
4.2. 모델 학습
이제 tokenizer가 준비되었다면, 실제로 모델학습을 해볼때인데요, 제일 간단한 형태로 빠르게 구성해보겠습니다.
먼저 모델 코드를 준비해줍니다. 위에서 sentencepiece vocab size를 5000으로 잡았기 때문에 5000의 input size를 가지는 Embedding 레이어, 그리고 연속적인 데이터를 잘 모델링하기 위해 LSTM, 그리고 LSTM의 출력값을 분류하기 위해 Dense Layer를 순차적으로 쌓았습니다. 메트릭, Loss, Optimizer는 가장 간단한 형태로 준비했습니다.
model = tf.keras.Sequential(
    [
        tf.keras.layers.Input(shape=[None], dtype=tf.int32, ragged=True),
        tf.keras.layers.Embedding(5000, 256),
        tf.keras.layers.LSTM(256),
        tf.keras.layers.Dense(256, activation="relu"),
        tf.keras.layers.Dense(2, activation="softmax"),
    ]
)
model.summary()
model.compile(optimizer="rmsprop", loss=tf.keras.losses.SparseCategoricalCrossentropy(), metrics="acc")
이제 데이터를 준비해줍니다.
먼저 tokenizer와 string tensor가 들어왔을 때 모델의 입력으로 변환해줄 함수부터 준비합니다.
방금 전 sentencepiece를 NFD로 unicode normalize한 텍스트를 타겟으로 학습시켰기 떄문에 입력 텐서 x에 대해 NFD로 normalize 후 tokenize 해줍니다.
with open("./spm.model", "rb") as spm_model:
    tokenizer = text.SentencepieceTokenizer(spm_model.read(), add_bos=True, add_eos=True)

def make_model_input(x: tf.Tensor) -> tf.Tensor:
    x = text.normalize_utf8(x, "NFD")
    return tokenizer.tokenize(x)
그 후 준비된 모델 입력 변환 함수와 tf.data 모듈을 활용하여 데이터셋을 준비해줍니다.
TextLine 데이터로 train와 test 데이터셋을 불러온 뒤 적절하게 파싱한 후 train에서 100개 정도의 batch를 가져와 dev셋도 만들어줍니다.
def parse_batch_tsv_rows(x: tf.Tensor) -> Tuple[tf.Tensor, tf.Tensor]:
    splits = tf.strings.split(x, sep="\t").to_tensor(shape=[tf.size(x), 3])
    model_inputs = make_model_input(splits[:, 1])
    labels = tf.strings.to_number(splits[:, 2])
    return model_inputs, labels

train_data = (
    tf.data.TextLineDataset("nsmc/ratings_train.txt")
    .skip(1)
    .shuffle(10000, reshuffle_each_iteration=True)
    .batch(64)
    .map(parse_batch_tsv_rows)
)
dev_data = train_data.take(100)
train_data = train_data.skip(100)

test_data = tf.data.TextLineDataset("nsmc/ratings_test.txt").skip(1).batch(256).map(parse_batch_tsv_rows)
이제 모델과 데이터가 전부 준비되었으니 남은 것은 학습과 평가뿐이겠죠? train_data, dev_data, test_data를 활용하여 학습과 평가를 진행해줍니다.
model.fit(train_data, validation_data=dev_data, epochs=3)
model.evaluate(test_data)
정상적으로 학습이 된다면 아래정도의 로그를 출력합니다.
Model: "sequential"
_________________________________________________________________
Layer (type)                 Output Shape              Param #
=================================================================
embedding (Embedding)        (None, None, 256)         1280000
_________________________________________________________________
lstm (LSTM)                  (None, 256)               525312
_________________________________________________________________
dense (Dense)                (None, 256)               65792
_________________________________________________________________
dense_1 (Dense)              (None, 2)                 514
=================================================================
Total params: 1,871,618
Trainable params: 1,871,618
Non-trainable params: 0
_________________________________________________________________
...
...
2244/2244 [==============================] - 161s 71ms/step - loss: 0.4242 - acc: 0.8019 - val_loss: 0.3179 - val_acc: 0.8612
Epoch 2/3
2244/2244 [==============================] - 160s 71ms/step - loss: 0.3174 - acc: 0.8646 - val_loss: 0.3001 - val_acc: 0.8737
Epoch 3/3
2244/2244 [==============================] - 160s 71ms/step - loss: 0.2935 - acc: 0.8775 - val_loss: 0.3034 - val_acc: 0.8759
196/196 [==============================] - 5s 24ms/step - loss: 0.3290 - acc: 0.8625
추가적으로 tensorflow-text를 사용하는 결정적인 이유인 preprocess 부터 model forward 과정까지를 tracing하여 saved model로 저장해보겠습니다. 이렇게 저장하게 된다면 tensorflow serving을 활용해서 바로 서버로 만들 수도 있습니다. 참고로 model의 속성으로 tokenizer를 할당해주는 이유는 저장될 saved model의 root 오브젝트(model)에 모든 오브젝트가 할당되어 있어야 해서 그렇습니다.
@tf.function(input_signature=tf.TensorSpec([None], dtype=tf.string))
def call(x: tf.Tensor) -> tf.Tensor:
    model_input = make_model_input(x)
    return model(model_input)

model.tokenizer = tokenizer
tf.saved_model.save(model, 'nsmc-model/0', call)
이제 단 50줄 정도의 스크립트로 NSMC 감정 분류 모델을 만들었는데요, 위에서 보시다싶이 아래와 같은 장점이 있습니다.
- 간편한 데이터 처리가 가능해지고,
- TensorFlow Graph안에 전처리, Tokenizer 코드를 통합 가능해지고,
- 그에 따라 서빙까지 자연스레 이어지는 코드가 만들어집니다.
후기
발표했던 행사 중에 제일 큰 규모인데, 준비하는 것과 발표하는 과정도 재밌어서 다행이었다. Gather town에서 행사를 진행했는데, 오거나이저분들이 많은 행사 이벤트(?)도 준비해주셔서 즐거웠다!